
Beyond the Unboxing: A Detailed Guide to Correct Washing Machine Plumbing & Setup
New washing machine in South Africa? Learn essential plumbing and setup tips to prevent leaks, ensure efficient operation, and extend your appliance’s lifespan - expert advice before your first load.

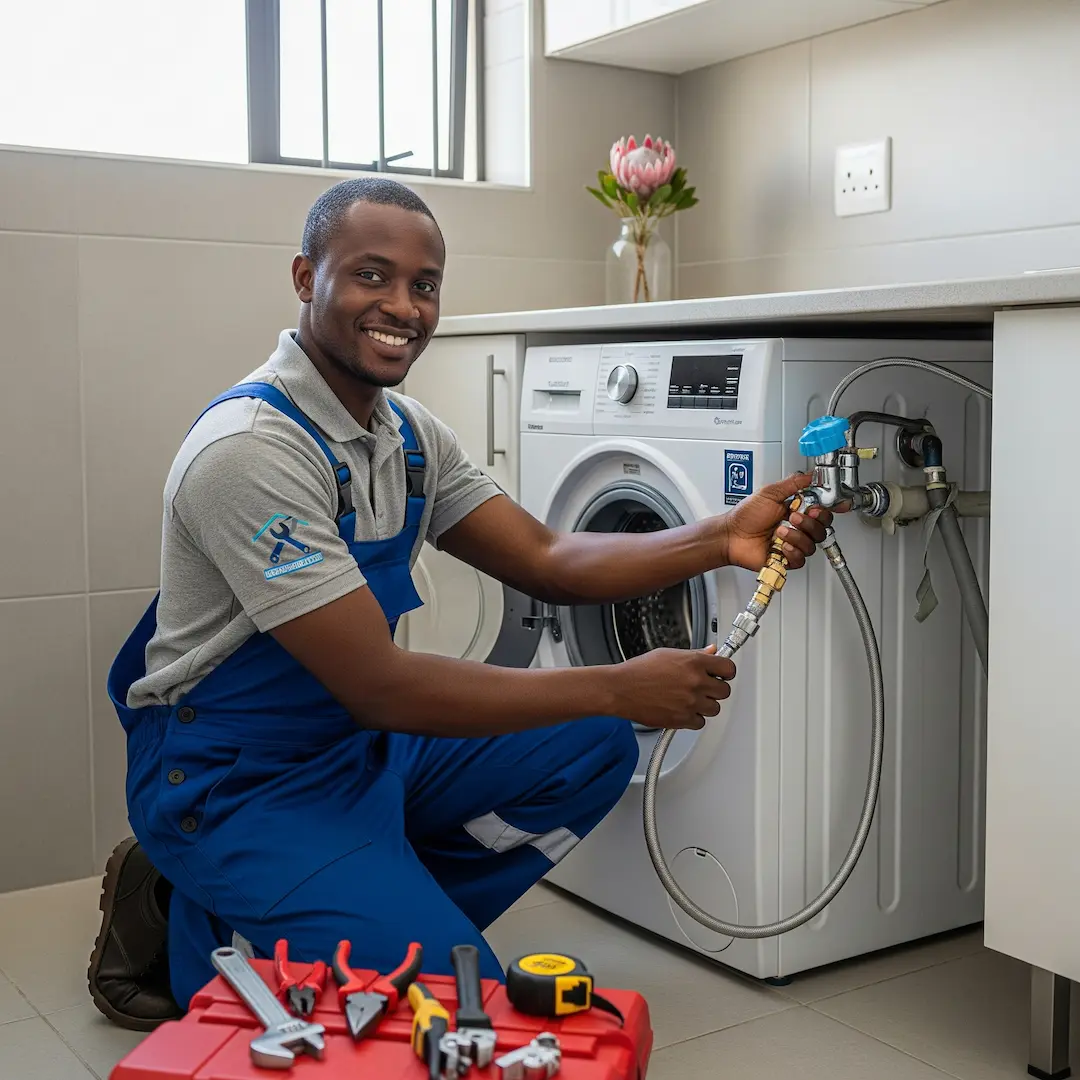
Bringing home a new washing machine is exciting! The thought of fresh laundry with less effort is always appealing. But before you toss in that first load, proper plumbing and setup are crucial. It's not just about getting water in; it's about ensuring your appliance runs efficiently, prevents leaks, and lasts for years. Our expert plumbers across South Africa often share insights on the common pitfalls they encounter, and based on their experience, we've put together this detailed guide to help you get it right from the start.
Understanding Your Washing Machine's Plumbing Needs
A washing machine relies on three main connections: hot water, cold water, and drainage. While most modern machines in South Africa are designed for fairly straightforward connections, older homes or specific layouts can present unique challenges. It’s vital to assess your existing plumbing setup before you begin.
- Water Supply: Most washing machines require both hot and cold water inlets. These are typically marked on the back of the machine. In South Africa, you'll commonly find standard tap connections (like those for a garden hose) or dedicated washing machine points with quarter-turn valves.
- Drainage: The wastewater needs a clear path out. This usually involves a standpipe that leads to your home's main drainage system. The drain hose from your washing machine will slot into this.
- Electrical Connection: While not plumbing, a dedicated and earthed power outlet is essential for safety and proper operation.
Step-by-Step Guide to Washing Machine Plumbing & Setup
Getting the plumbing right requires a methodical approach. Here's how to ensure a proper and leak-free installation, drawing on the wisdom of experienced plumbers.
1. Unpacking and Initial Placement
Carefully unbox your washing machine. Remove all packaging materials, including any transit bolts or shipping restraints. These bolts, often found at the back of the machine, are designed to secure the drum during transport and must be removed before operation. Failure to do so can cause significant damage to the machine and void its warranty. Keep these bolts in case you ever need to move the machine again.
Position the washing machine near its designated water supply, drainage, and power outlets. Don't push it completely into place yet; you'll need access to the back.
2. Connecting the Water Supply Hoses
This is where the real plumbing begins. Most washing machines come with two inlet hoses, often colour-coded (red for hot, blue for cold) or clearly labelled.
- Identify Inlet Points: On the back of your washing machine, locate the hot and cold water inlet valves. They'll typically have screw threads.
- Attach Hoses to Machine: Screw the appropriate hose (hot to hot, cold to cold) onto the washing machine's inlet valves by hand, then gently tighten with a spanner. Be careful not to overtighten, as this can damage the plastic threads.
- Connect Hoses to Wall Taps: Now, connect the other ends of the hoses to your home's water supply taps. In many South African homes, you might encounter standard bib taps or dedicated washing machine taps. If you have older, screw-down bib taps, ensure the rubber washers within the hose connectors are in good condition for a watertight seal. For quarter-turn washing machine taps, simply screw on the hoses and hand-tighten. Again, use a spanner for a final gentle snugging.
- Open Water Supply: Once both hoses are securely connected, slowly open the hot and cold water taps. Listen for any hissing sounds or visible drips. This is your first check for leaks.
3. Setting Up the Drainage Hose
The drain hose removes the dirty water. Proper positioning is key to preventing backflow and overflows.
- Locate the Drain Outlet: Most washing machines have a flexible drain hose that exits from the back.
- Position in Standpipe: Insert the curved end of the drain hose into a standpipe or utility sink. The standpipe should be tall enough (typically around 60-90 cm from the floor) to create an air gap, preventing dirty water from siphoning back into the machine or mixing with your potable water supply. A common mistake seen by our professionals is the drain hose being pushed too far down the standpipe, which can create a siphoning effect and cause the machine to continuously drain, leading to poor wash results and increased water usage. Ensure there's an air gap.
- Secure the Hose: If using a standpipe, there's often a plastic clip or a hook to secure the drain hose, preventing it from slipping out during the wash cycle. Make sure it's firmly in place.
4. Leveling the Washing Machine
This step is often overlooked but is absolutely critical for the washing machine's performance and longevity. An unlevel machine can vibrate excessively, especially during the spin cycle, leading to noise, premature wear and tear on components, and even movement across the floor.
- Use a Spirit Level: Place a spirit level on top of your washing machine, both front-to-back and side-to-side.
- Adjust Feet: Washing machines have adjustable feet (usually four) at the bottom. Turn the feet clockwise to lower a corner and anti-clockwise to raise it. Adjust each foot until the bubble in the spirit level is perfectly centred in both directions.
- Check Stability: Once level, gently rock the machine from corner to corner to ensure it's stable and doesn't wobble. All four feet should be firmly on the ground.
5. Electrical Connection
Plug the washing machine into a dedicated, earthed electrical outlet. Avoid using extension cords or multi-plugs, as this can overload circuits and pose a fire hazard. Ensure the outlet is easily accessible in case you need to disconnect power quickly.
6. Final Leak Checks and Test Cycle
Before you celebrate, it's essential to run a test cycle.
- Initial Visual Inspection: Double-check all water connections for any signs of drips or leaks.
- Run a Short Cycle: Select a short, empty wash cycle (e.g., a quick rinse or drain cycle) without any laundry.
- Monitor Closely: During this cycle, carefully watch all connections – both water inlet and drain – for any leaks. Pay attention to the floor around and under the machine.
- Listen for Unusual Noises: Listen for any excessive vibrations, rattling, or unusual noises. If the machine is rocking or making excessive noise, it likely needs further leveling adjustments.
If you observe any leaks, immediately turn off the water supply and tighten the connections. If issues persist, it's best to call a qualified plumber.
When to Call a Professional
While setting up a washing machine might seem straightforward, there are situations where calling a professional plumber is not just advisable, but necessary.
- No Existing Connections: If you don't have suitable hot, cold, or drainage connections in your desired washing machine location, a plumber will be needed to install them. This often involves extending pipes, adding new taps, and setting up a proper standpipe.
- Complex Plumbing Issues: Older homes in South Africa can have unique plumbing configurations. If your taps are seized, pipes are corroded, or you're unsure about the existing drainage system, a professional can assess and resolve these issues safely.
- Pressure Problems: If your water pressure is too low or too high, it can affect your washing machine's performance. A plumber can diagnose and suggest solutions.
- Safety Concerns: Any uncertainty regarding electrical connections, water pressure, or potential leaks should prompt a call to an expert. Plumbing mistakes can lead to costly water damage or even electrical hazards. Our professionals regularly encounter situations where incorrect DIY attempts have led to burst pipes or extensive water damage, highlighting the importance of getting it right the first time.
Frequently Asked Questions
Can I use only cold water for my washing machine if I don't have a hot water connection?
While most modern washing machines can technically operate on cold water only, they are designed with a hot water inlet for optimal performance. Some machines have internal heaters to warm cold water, but this can be less energy-efficient. If you only have a cold water connection, you can cap off the hot water inlet on the machine, but be aware that certain wash cycles may not perform as intended without a hot water supply.
How often should I check my washing machine hoses for wear and tear?
It's a good practice to visually inspect your washing machine hoses at least once a year. Look for any signs of cracking, bulging, fraying, or rust near the connectors. If you notice any of these, it's time to replace the hoses. Hoses typically have a lifespan of about 5-7 years, but this can vary.
What is the ideal height for a washing machine drain standpipe?
The ideal height for a washing machine drain standpipe is typically between 60 cm and 90 cm from the floor. This height ensures there's an adequate air gap, which prevents back siphoning of dirty water into the washing machine or into your clean water supply. If the standpipe is too low, it can lead to continuous draining.
My new washing machine vibrates excessively during the spin cycle. What could be the cause?
Excessive vibration is most commonly caused by the washing machine not being properly level. Re-check the leveling using a spirit level and adjust the machine's feet until it is perfectly stable on all four corners. Another common cause, particularly with new machines, is not removing the transit bolts (shipping restraints) that secure the drum during transport. These must be removed before operation.
Suzette Meyer is the lead author and content creator for Kandua.com, South Africa’s #1 marketplace for home services. Suzette has made it her mission to help homeowners with advice on all aspects of home repair, maintenance and improvement, including how to choose the right Pro and how to make smart upgrades that improve your resale value or save costs.

Related articles, advice and more
.webp)
What Does a Plumbing Call-Out Fee Usually Include?
When that familiar drip-drip-drip starts under the kitchen sink or your geyser begins a slow weep in the ceiling, the first thing most South African homeowners do is pick up the phone. But before a wrench even touches a pipe, you’ll likely hear the term "call-out fee."
.jpg)
How to Choose Between Repair and Replacement for Your Geyser
Deciding between repairing and replacing isn't just about the immediate price tag. It is about safety, long-term electricity savings, and compliance with South African building regulations. Based on insights from vetted plumbers across Johannesburg, Cape Town, and Durban, this guide will help you navigate that decision with confidence.
.jpg)
What to Do If Your Electric Problem Comes Back After Repair
There are few things more frustrating than paying for a repair only to have the lights flicker, the breaker trip, or the plug point fail again a few days later. Here is a step-by-step guide to handling the situation professionally, safely, and effectively to get it sorted out for good.
.jpg)
Understanding Geyser Warranties in South Africa
For most South African households, the geyser is the hardest-working appliance in the home. To help you protect your investment, we have broken down exactly how Geyser warranties work in South Africa, drawing on insights from qualified plumbers who handle rejected claims daily.
.webp)
How Hard Water Damages Your Plumbing (and What to Do About It)
If you suspect you have hard water, you are in the "awareness" stage of a very important journey for your home's maintenance. Ignoring it can lead to burst geysers and clogged pipes. This guide, compiled with insights from top local plumbers, will explain exactly how hard water affects your plumbing and the practical steps you can take to fix it.
.webp)
.webp)
.webp)
Latest articles, advice and more
%20(1).webp)
%20(1).webp)
.webp)
How to Check If an Electrician Is Registered with ECB
The Electrical Conformance Board of South Africa (ECB) serves as a vital gatekeeper in this industry. If you are in the middle of a renovation or just need a new DB board installed, knowing how to verify your electrician’s registration is the most important step you can take.
What Does a Plumbing Call-Out Fee Usually Include?
When that familiar drip-drip-drip starts under the kitchen sink or your geyser begins a slow weep in the ceiling, the first thing most South African homeowners do is pick up the phone. But before a wrench even touches a pipe, you’ll likely hear the term "call-out fee."
How to Choose Between Repair and Replacement for Your Geyser
Deciding between repairing and replacing isn't just about the immediate price tag. It is about safety, long-term electricity savings, and compliance with South African building regulations. Based on insights from vetted plumbers across Johannesburg, Cape Town, and Durban, this guide will help you navigate that decision with confidence.
.webp)
Beyond the Unboxing: A Detailed Guide to Correct Washing Machine Plumbing & Setup
New washing machine in South Africa? Learn essential plumbing and setup tips to prevent leaks, ensure efficient operation, and extend your appliance’s lifespan - expert advice before your first load.
.webp)
New Washing Machine? Don't Plug It In Yet! Essential Installation Tips for SA Homes
Installing a new washing machine? Learn the essential setup steps South African homeowners often overlook to prevent leaks, noise, and damage—and ensure efficient, long-lasting performance from day one.
.webp)
TV Repair Costs in South Africa: Diagnosing Screen, Power & Component Issues
Find out what TV repairs really cost in South Africa – from call-out and diagnosis fees to screen, power and main board fixes – and when it’s cheaper to replace your TV instead of repairing it.
.webp)
Septic Tank Leak Repair Cost in South Africa: Addressing Odours & Environmental Hazards
Learn typical septic tank leak repair costs in South Africa, what drives the price up, how to spot early warning signs (odours, soggy ground, backups), and when it’s safer and cheaper to get a professional in.
.webp)
Hidden Water Leak Detection Cost in South Africa: Non-Invasive Solutions
Discover what hidden water leak detection really costs in South Africa – from acoustic and thermal imaging to tracer gas – and when it’s worth calling a non-invasive leak detection specialist to avoid massive water damage and repair bills.
How to Install a Horizontal Geyser | Step-by-Step Pro Guide
Want to install a geyser like a pro? This step-by-step tutorial shows you exactly how to do a horizontal Ariston Axios geyser installation, straight from the BluLever plumbing workshop. 🎥 Hosted by MK, BluLever’s technical facilitator, and supported by a qualified electrician, Life and a BluLever graduate artisan, Zinhle. This is your ultimate guide to a SANS 10254-compliant installation — from preparing the wall, to plumbing, electrical wiring, and pro troubleshooting tips.
How to Maintain a Geyser | Step-by-Step Pro Guide
Want to maintain a geyser like a pro? This step-by-step tutorial shows you exactly how to do the three core geyser maintenance checks on an Ariston Axios geyser installation, straight from the BluLever plumbing workshop. 🎥 Hosted by MK, BluLever’s technical facilitator, and supported by a qualified electrician, Life. This is your ultimate guide to geyser maintenance — from diagnosing the problem to checking the heat regulation of the geyser, to pressure regulation and then finally corrosion protection.
%201.avif)
Not just another newsletter. It's an advantage


From problem to solved


.svg)