
New Washing Machine? Essential Post-Installation Tips for SA Households
New washing machine installed in South Africa? Discover essential post-installation tips to prevent leaks, improve efficiency, and extend your appliance’s lifespan - expert advice every household should follow.

New Washing Machine? Essential Post-Installation Tips for SA Households
Bringing a new washing machine into your home is exciting! Once the installation is complete, it's easy to just start washing, but taking a few extra steps can make all the difference in the longevity and efficiency of your appliance, and prevent common headaches like leaks or drainage issues. Think of it as a post-installation check-up to ensure everything runs smoothly.
Our trusted plumbing experts often share valuable insights after installing washing machines across South Africa. They've seen it all – from minor drips to significant water damage – and much of it can be avoided with some simple, ongoing attention.
Why Post-Installation Care Matters
Proper post-installation care isn't just about avoiding immediate problems; it's about safeguarding your investment. A washing machine is a significant household appliance, and ensuring it operates correctly from day one helps prevent costly repairs down the line, saves on water and electricity, and keeps your laundry routine running without a hitch.
Essential Post-Installation Checks and Ongoing Maintenance
Even after a professional installation, there are a few key areas you should regularly monitor to ensure your washing machine remains in top condition.
1. Confirming Your Washing Machine is Level
This might seem basic, but a level washing machine is crucial for its performance and lifespan. Our experts often highlight that vibrations from an unbalanced machine are a leading cause of wear and tear, and can even cause the machine to "walk" across the floor.
- How to check: Gently rock your washing machine from corner to corner. If it wobbles, it’s not level. Most machines have adjustable feet at the bottom.
- How to adjust: With the help of another person, carefully tilt the machine slightly to access the feet. Turn the feet clockwise to lower the corner or anti-clockwise to raise it until all four corners are stable on the floor. Use a spirit level on top of the machine (both front-to-back and side-to-side) for precision.
- Expert Tip: One plumber recounted a call-out where a customer's brand-new machine was vibrating excessively. It turned out the initial installation, though done by a professional, hadn't quite got the levelling perfect on an uneven laundry room floor. A quick adjustment of the feet solved the problem, preventing potential damage to the machine's internal components.
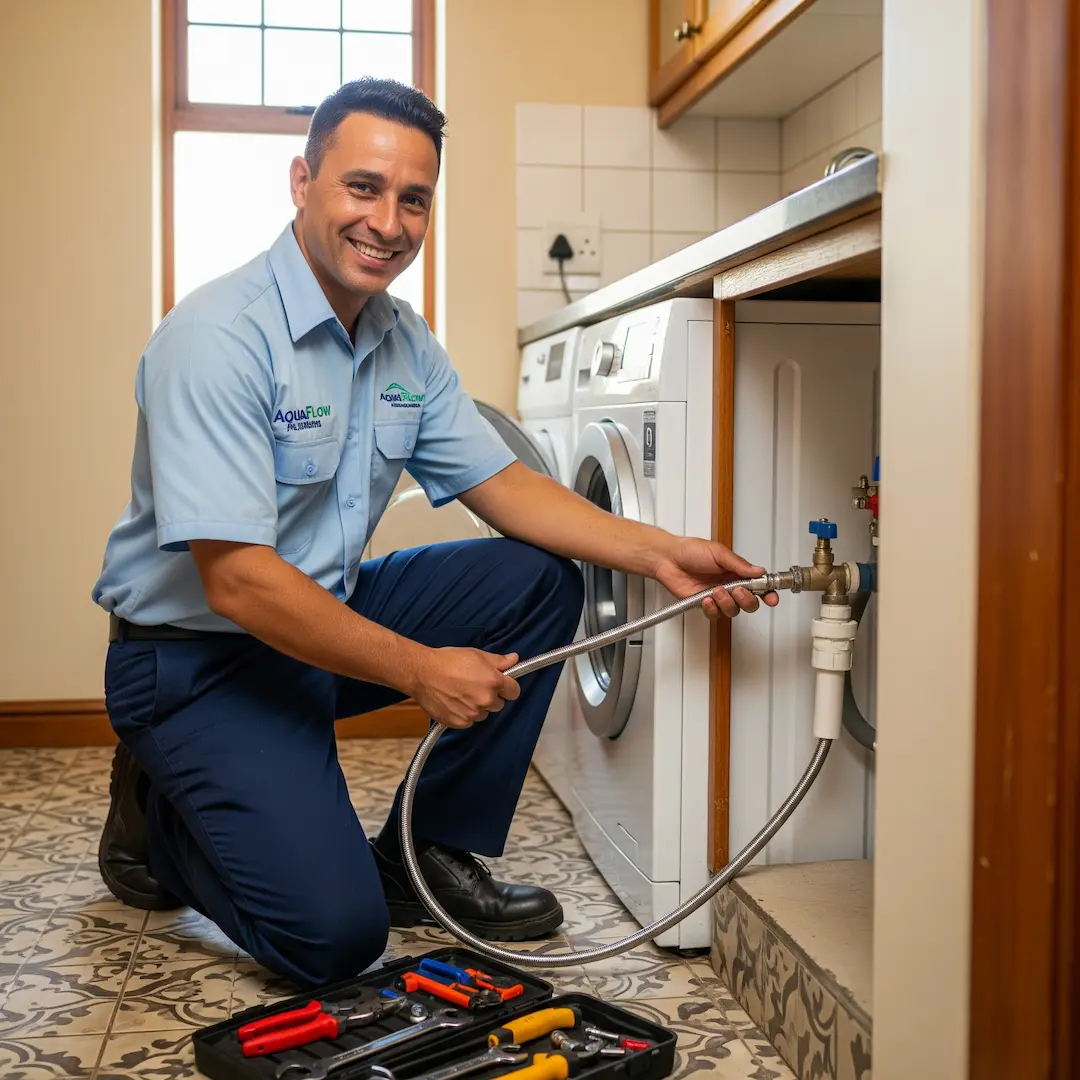
2. Regularly Inspecting Hose Connections
The water inlet hoses (hot and cold) and the drainage hose are your machine's lifelines. Leaks from these connections are common culprits for water damage.
- Water Inlet Hoses:Check for tightness: Feel around the connections at both the tap and the back of the washing machine. They should be snug, but don't overtighten them as this can damage the rubber washers.
- Look for drips: Even a slow drip can cause significant damage over time. Check for any signs of water around the connections, especially after a wash cycle.
- Inspect for wear and tear: Over time, hoses can degrade, crack, or bulge. Periodically check the entire length of the hoses for any visible damage. Some plumbers recommend replacing hoses every five years, even if they look fine, as a preventative measure.
- Drainage Hose:Secure placement: Ensure the drainage hose is securely hooked into your standpipe or sink, and that it isn't kinked or blocked.
- Proper height: The standpipe for drainage should typically be higher than the machine's water level during a cycle to prevent siphoning (where water drains out continuously, leading to insufficient water for washing). Most manufacturers specify a minimum and maximum standpipe height, usually between 65cm and 90cm from the floor.
- Expert Anecdote: A professional once shared a story about a customer whose laundry room always had a damp smell, even though there were no visible leaks. After inspection, it was discovered the drainage hose was inserted too far down the standpipe, creating an airlock issue and causing slow, inefficient drainage that led to residual dampness. A simple adjustment of the hose's depth resolved the issue.
3. Cleaning the Lint Trap (Filter)
Many washing machines, especially front-loaders, have a small filter, often called a lint trap or coin trap, located at the bottom front of the machine. This trap catches lint, coins, buttons, and other small items that accidentally make their way into your laundry.
- Why it's important: A clogged lint trap can lead to drainage problems, foul odours, and reduced washing efficiency. It puts extra strain on the machine's pump.
- How to clean: Refer to your washing machine's manual for the exact location and cleaning instructions. Typically, you'll need to place a shallow tray or towel under the filter to catch any residual water. Unscrew the cap slowly, allow water to drain, and then pull out the filter to remove any debris.
- Frequency: Our experts recommend cleaning this trap every few months, or more frequently if you wash a lot of lint-producing items like towels or pet blankets.
4. Understanding Drainage Nuances Specific to SA Plumbing Systems
South African homes often have specific plumbing configurations that can influence washing machine drainage. Being aware of these can help prevent blockages and overflows.
- Standpipe vs. Sink Drainage: Most modern installations use a dedicated standpipe. If your machine drains into a sink, ensure the hose is securely fastened to prevent it from flopping out during vigorous draining cycles, which can lead to a messy flood.
- Shared Drain Lines: In some older homes or apartments, your washing machine's drain might share a line with other fixtures like a kitchen sink. This can sometimes lead to blockages if too much grease or food waste goes down the shared drain. Be mindful of what goes down your kitchen sink if it shares a drain with your laundry.
- Foreign Objects: Plumbers frequently find foreign objects (like socks, small toys, or even cutlery) obstructing washing machine pumps and drain lines. Always check pockets before washing!
- Expert Insight: One common issue observed by plumbers in SA is the "fatberg" phenomenon in shared drainage systems, especially in older buildings. If kitchen grease combines with lint from washing machines in a shared drain, it can create stubborn blockages. Regular maintenance, like flushing drains with hot water (if safe for your pipes) and using a proper lint trap, can help mitigate this.
5. Using the Right Detergent and Amount
Using too much detergent, or the wrong type, can lead to excessive suds, which can overflow from the machine, or leave residue on your clothes and in the machine itself.
- High-Efficiency (HE) Detergent: If your washing machine is a high-efficiency model, it requires HE detergent, which is low-sudsing. Using regular detergent in an HE machine can create too many suds, potentially damaging the machine or causing error codes.
- Measure Correctly: Always follow the detergent manufacturer's recommendations for the amount to use, based on your load size and water hardness. More isn't always better.
6. Periodic Maintenance Washes
Running a maintenance wash helps to clean the inside of your washing machine, removing detergent residue, mould, and mildew that can build up over time and cause unpleasant odours.
- How to do it: Run an empty cycle on the hottest setting (e.g., 60°C or 90°C), often with a cup of white vinegar or a specialised washing machine cleaner poured into the detergent dispenser.
- Frequency: Aim to do this every 1-2 months, especially if you tend to use cooler wash cycles.
By dedicating a little time to these post-installation tips and ongoing maintenance, you'll ensure your new washing machine delivers clean laundry efficiently for years to come, giving you peace of mind in your South African home.
Frequently Asked Questions
How do I know if my washing machine is draining properly?
You can tell if your washing machine is draining properly by observing the water level during the drain cycle and checking if clothes are spun dry at the end of the wash. If water remains in the drum, clothes are still soaking wet, or the machine shows a drainage error code, it's likely not draining correctly.
What are the common reasons for a washing machine to leak after installation?
Common reasons for a washing machine to leak after installation include loose or improperly tightened water inlet hoses, a poorly positioned or kinked drainage hose, a clogged lint filter, or damage to the detergent dispenser or door seal.
How often should I clean the detergent dispenser drawer?
It's a good practice to clean your detergent dispenser drawer every few weeks or whenever you notice a build-up of detergent residue or mould. Simply pull out the drawer (most are removable) and wash it under warm water, using an old toothbrush to scrub away any grime.
Can an unbalanced washing machine cause damage?
Yes, an unbalanced washing machine can cause significant damage over time. The excessive vibrations can wear down internal components, particularly the bearings and suspension system, leading to costly repairs and a shorter lifespan for the appliance. It can also cause the machine to move or "walk" across the floor during spin cycles.
Suzette Meyer is the lead author and content creator for Kandua.com, South Africa’s #1 marketplace for home services. Suzette has made it her mission to help homeowners with advice on all aspects of home repair, maintenance and improvement, including how to choose the right Pro and how to make smart upgrades that improve your resale value or save costs.

Related articles, advice and more
.webp)
What Does a Plumbing Call-Out Fee Usually Include?
When that familiar drip-drip-drip starts under the kitchen sink or your geyser begins a slow weep in the ceiling, the first thing most South African homeowners do is pick up the phone. But before a wrench even touches a pipe, you’ll likely hear the term "call-out fee."
.jpg)
How to Choose Between Repair and Replacement for Your Geyser
Deciding between repairing and replacing isn't just about the immediate price tag. It is about safety, long-term electricity savings, and compliance with South African building regulations. Based on insights from vetted plumbers across Johannesburg, Cape Town, and Durban, this guide will help you navigate that decision with confidence.
.jpg)
What to Do If Your Electric Problem Comes Back After Repair
There are few things more frustrating than paying for a repair only to have the lights flicker, the breaker trip, or the plug point fail again a few days later. Here is a step-by-step guide to handling the situation professionally, safely, and effectively to get it sorted out for good.
.jpg)
Understanding Geyser Warranties in South Africa
For most South African households, the geyser is the hardest-working appliance in the home. To help you protect your investment, we have broken down exactly how Geyser warranties work in South Africa, drawing on insights from qualified plumbers who handle rejected claims daily.
.webp)
How Hard Water Damages Your Plumbing (and What to Do About It)
If you suspect you have hard water, you are in the "awareness" stage of a very important journey for your home's maintenance. Ignoring it can lead to burst geysers and clogged pipes. This guide, compiled with insights from top local plumbers, will explain exactly how hard water affects your plumbing and the practical steps you can take to fix it.
.webp)
.webp)
Latest articles, advice and more
%20(1).webp)
%20(1).webp)
.webp)
How to Check If an Electrician Is Registered with ECB
The Electrical Conformance Board of South Africa (ECB) serves as a vital gatekeeper in this industry. If you are in the middle of a renovation or just need a new DB board installed, knowing how to verify your electrician’s registration is the most important step you can take.
What Does a Plumbing Call-Out Fee Usually Include?
When that familiar drip-drip-drip starts under the kitchen sink or your geyser begins a slow weep in the ceiling, the first thing most South African homeowners do is pick up the phone. But before a wrench even touches a pipe, you’ll likely hear the term "call-out fee."
How to Choose Between Repair and Replacement for Your Geyser
Deciding between repairing and replacing isn't just about the immediate price tag. It is about safety, long-term electricity savings, and compliance with South African building regulations. Based on insights from vetted plumbers across Johannesburg, Cape Town, and Durban, this guide will help you navigate that decision with confidence.
.webp)
Beyond the Unboxing: A Detailed Guide to Correct Washing Machine Plumbing & Setup
New washing machine in South Africa? Learn essential plumbing and setup tips to prevent leaks, ensure efficient operation, and extend your appliance’s lifespan - expert advice before your first load.
.webp)
New Washing Machine? Don't Plug It In Yet! Essential Installation Tips for SA Homes
Installing a new washing machine? Learn the essential setup steps South African homeowners often overlook to prevent leaks, noise, and damage—and ensure efficient, long-lasting performance from day one.
.webp)
TV Repair Costs in South Africa: Diagnosing Screen, Power & Component Issues
Find out what TV repairs really cost in South Africa – from call-out and diagnosis fees to screen, power and main board fixes – and when it’s cheaper to replace your TV instead of repairing it.
.webp)
Septic Tank Leak Repair Cost in South Africa: Addressing Odours & Environmental Hazards
Learn typical septic tank leak repair costs in South Africa, what drives the price up, how to spot early warning signs (odours, soggy ground, backups), and when it’s safer and cheaper to get a professional in.
.webp)
Hidden Water Leak Detection Cost in South Africa: Non-Invasive Solutions
Discover what hidden water leak detection really costs in South Africa – from acoustic and thermal imaging to tracer gas – and when it’s worth calling a non-invasive leak detection specialist to avoid massive water damage and repair bills.
How to Install a Horizontal Geyser | Step-by-Step Pro Guide
Want to install a geyser like a pro? This step-by-step tutorial shows you exactly how to do a horizontal Ariston Axios geyser installation, straight from the BluLever plumbing workshop. 🎥 Hosted by MK, BluLever’s technical facilitator, and supported by a qualified electrician, Life and a BluLever graduate artisan, Zinhle. This is your ultimate guide to a SANS 10254-compliant installation — from preparing the wall, to plumbing, electrical wiring, and pro troubleshooting tips.
How to Maintain a Geyser | Step-by-Step Pro Guide
Want to maintain a geyser like a pro? This step-by-step tutorial shows you exactly how to do the three core geyser maintenance checks on an Ariston Axios geyser installation, straight from the BluLever plumbing workshop. 🎥 Hosted by MK, BluLever’s technical facilitator, and supported by a qualified electrician, Life. This is your ultimate guide to geyser maintenance — from diagnosing the problem to checking the heat regulation of the geyser, to pressure regulation and then finally corrosion protection.
%201.avif)
Not just another newsletter. It's an advantage


From problem to solved


.svg)