

Choosing & Installing the Right Inverter for Load Shedding in South Africa: A Comprehensive Guide
Struggling with load shedding in South Africa? This guide explains how to choose the right inverter and battery system and ensure safe, professional installation for reliable backup power.

Load shedding has become an unfortunate reality for many South African households, making reliable backup power solutions more of a necessity than a luxury. Among the most popular options are inverter and battery systems, offering a cleaner, quieter alternative to generators. But with so many choices, how do you pick the right one for your home and ensure it's installed correctly and safely? This guide will walk you through the essential considerations, drawing on insights from experienced electricians across the country.
Understanding Your Power Needs: How to Size Your Inverter
The first and most critical step in choosing an inverter and battery system is to accurately assess your household's power requirements during load shedding. You wouldn't want to invest in a system only to find it can't power your essential appliances, or worse, is significantly oversized for your actual needs.
As many seasoned installers will tell you, the key here is to identify exactly what you need to run during an outage, not what you want to run. Think about what truly keeps your household functioning comfortably. Is it just the Wi-Fi router, TV, and a few lights? Or do you also need to keep the fridge running, perhaps a microwave, and a few other small appliances?
To determine the right size, you'll need to do a little homework:
- List Your Essential Appliances: Go through your home and make a list of all the appliances you absolutely need to power during load shedding. This might include:
- Lights (LEDs consume far less power than incandescent bulbs)
- Wi-Fi router and fibre box
- Laptop chargers
- TV and DStv decoder
- Fridge/freezer (especially crucial)
- Security system
- Electric fence (if applicable)
- Any medical equipment (e.g., CPAP machine)
- Find the Wattage: For each appliance, check its wattage (W) rating. This is usually found on a sticker at the back or bottom of the appliance, or in its manual. If it shows Amps (A) and Volts (V), you can calculate wattage using the formula: Watts = Volts x Amps. For instance, a typical fridge might use around 150-200W, while a TV could be 50-100W.
- Calculate Total Peak Load: Sum up the wattage of all the appliances you expect to run simultaneously during load shedding. This gives you your total peak load. For example, if your lights total 100W, router 20W, TV 80W, and fridge 150W, your simultaneous load is 350W.
- Factor in Start-up Surges: Some appliances, especially those with motors like fridges or microwaves, have a much higher "start-up" or "surge" wattage that lasts for a few seconds. An inverter needs to be able to handle this momentary spike. A common rule of thumb from our experts is to budget for 2-3 times the running wattage for these appliances when considering your inverter's surge capacity. For instance, a fridge running at 150W might surge to 450W on startup.
- Determine Inverter VA Rating: Inverters are typically rated in kVA (kiloVolt-Amperes) or VA. While Watts (W) represent real power, VA is apparent power. As a general guideline for residential use, your inverter's VA rating should be about 20-25% higher than your calculated total running wattage to account for power factor and efficiency losses. So, if your total running load is 1000W, you might look for a 1.2kVA or 1.5kVA inverter.
- Expert Tip: A common mistake we've observed is homeowners underestimating their peak load, leading to tripped inverters. Always err on the side of caution when calculating, or better yet, get a qualified electrician to conduct an energy audit. They can use specialised equipment to measure your actual consumption.
Types of Inverters and Battery Compatibility
Not all inverters are created equal, and the type you choose will significantly impact the performance and compatibility with your appliances.
- Pure Sine Wave Inverters: These are the gold standard. They produce a clean, smooth alternating current (AC) waveform that is virtually identical to the power supplied by Eskom. This makes them ideal for sensitive electronics like laptops, smart TVs, medical equipment, and appliances with motors, as it prevents buzzing, overheating, and potential damage. Many experienced electricians strongly recommend pure sine wave inverters for most home applications due to their broad compatibility and protection for your valuable electronics.
- Modified Sine Wave Inverters: These are generally more affordable but produce a stepped, blocky AC waveform. While they might work for basic resistive loads like incandescent lights or heating elements, they are not suitable for sensitive electronics or appliances with motors. Using them with such devices can lead to poor performance, buzzing sounds, overheating, and even premature failure of the appliance. Many installers have seen firsthand the damage caused by using modified sine wave inverters with incompatible equipment. It’s a classic case of saving a few rand upfront only to incur much larger repair or replacement costs later.
- Hybrid Inverters: These advanced inverters are designed to work with both solar panels and battery storage, and can also interact with the grid. They offer the flexibility to charge batteries from solar, from the grid, or a combination, and can seamlessly switch between power sources. If you're considering adding solar panels in the future, a hybrid inverter is a smart investment, as it will future-proof your setup.
Battery Compatibility
The inverter and battery form a symbiotic relationship. Choosing the right battery is just as crucial as selecting the inverter.
- Lead-Acid Batteries: These are a more traditional and generally more affordable option. They include sealed lead-acid (SLA), gel, and AGM batteries. While cost-effective upfront, they have a shorter lifespan, lower depth of discharge (meaning you shouldn't drain them completely), and require more maintenance (for flooded types).
- Lithium-Ion Batteries: While a larger initial investment, lithium-ion batteries (like LiFePO4 – Lithium Iron Phosphate) offer significant advantages. They have a much longer lifespan, a higher depth of discharge (you can use almost all their stored energy), are maintenance-free, and are more compact. For the average South African homeowner looking for a long-term, reliable load shedding solution, a reputable lithium-ion battery is often recommended by our trusted professionals due to its superior performance and longevity.
- Practical Example: A homeowner in Bryanston once opted for a cheaper lead-acid battery setup. Within three years, they were facing significant capacity degradation and needing costly replacements. Had they invested slightly more in lithium-ion initially, they would have saved money and hassle in the long run.
The Typical Inverter Installation Process
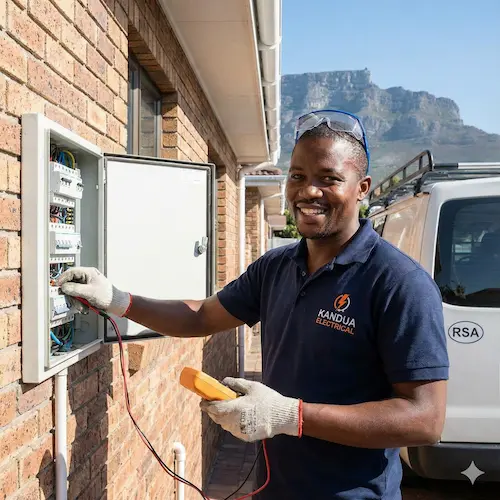
Installing an inverter and battery system is not a DIY job for the average homeowner. It involves working with high voltages and currents and requires a deep understanding of electrical systems. In South Africa, such installations must be carried out by a qualified and registered electrician holding an Installation Electrician (IE) or Master Installation Electrician (MIE) license, who can issue a Certificate of Compliance (CoC). This is not just a safety recommendation, it's a legal requirement under SANS 10142-1 regulations.
Here's a general overview of what a professional installation entails:
- Site Assessment and Planning: The electrician will first assess your home's electrical system, identify suitable locations for the inverter and batteries (typically a cool, well-ventilated, secure space like a garage or utility room, away from direct sunlight and moisture), and plan the cable routes. They'll also verify your distribution board (DB) can accommodate the new connections.
- Mounting the Inverter: The inverter is securely mounted on a wall using appropriate brackets, ensuring it's stable and accessible for maintenance. Due to their weight, especially larger units, proper mounting is crucial.
- Battery Installation and Wiring (DC Side): The batteries are placed in their designated location and wired to the inverter's DC input terminals. This involves connecting positive to positive and negative to negative terminals, using appropriately sized DC cables. Overcurrent protection (fuses or DC circuit breakers) are installed between the batteries and the inverter to protect against short circuits or overloads. This DC wiring is critical and must be done precisely to prevent damage to the inverter or batteries and to ensure safety.
- Connecting the Inverter to the Distribution Board (AC Side): This is where the inverter integrates with your home's electrical system.
- Input Connection: The inverter requires an AC input, typically connected to a dedicated circuit breaker in your main DB. This allows the inverter to charge the batteries from the grid when available.
- Output Connection: The inverter's AC output is then connected to a separate section of your DB that powers your chosen essential circuits (lights, plugs for specific appliances, etc.). This often involves installing new circuit breakers for the inverter's output circuits.
- Changeover Switch: A critical component for safety and functionality is a changeover switch (manual or automatic). This switch allows you to seamlessly transfer the power supply for your essential circuits between the Eskom grid and the inverter's output. This prevents the inverter from back-feeding into the grid (which is dangerous for technicians working on the grid) and ensures your home only receives power from one source at a time.
- Earthing: Proper earthing of the inverter system is paramount for safety, in accordance with SANS regulations, to prevent electrical shocks.
- System Configuration and Testing: Once all physical connections are made, the electrician will configure the inverter settings (e.g., charging parameters for the batteries, low-voltage disconnect points) according to the manufacturer's specifications and your power needs. They will then conduct thorough testing to ensure the system is functioning correctly, including simulating a power outage to verify the automatic switchover (if an ATS is installed) and checking voltage and current readings.
- Real-world scenario: An electrician once recounted a job where a DIY enthusiast tried to connect an inverter directly to a plug point without a proper changeover switch. Not only did it risk damaging the inverter, but it created a severe safety hazard by potentially feeding power back into the grid, endangering municipal workers. This highlights why professional installation is non-negotiable.
- Issuing the Certificate of Compliance (CoC): Upon successful installation and testing, the qualified electrician will issue a Certificate of Compliance (CoC) for the new electrical work. This document is crucial for insurance purposes, proving that the installation meets national safety standards (SANS 10142-1) and was carried out by a competent professional. Without a valid CoC, your insurance claim might be rejected in the event of an electrical fire or damage linked to the inverter system.
Final Thoughts on Safety and Trust
While the idea of having uninterrupted power is appealing, the complexities of inverter and battery installation, particularly regarding AC/DC wiring and integration with your home's main electrical distribution board, mean it is a job strictly for qualified professionals. Attempting to install an inverter system yourself without the necessary expertise and adherence to SANS regulations can lead to serious hazards, including electrical fires, electrocution, and damage to your appliances or the inverter itself. Always prioritise safety and compliance by engaging a registered South African electrician with proven experience in inverter and battery installations.
Frequently Asked Questions
How long do inverter batteries typically last?
The lifespan of inverter batteries varies significantly depending on the type and usage. Lead-acid batteries generally last between 2 to 5 years, while higher-quality lithium-ion batteries can last 10 to 15 years or even longer, especially if they are not deeply discharged regularly. Proper charging and maintenance also play a crucial role in extending their lifespan.
Can an inverter power my geyser or stove during load shedding?
Geysers and electric stoves are high-wattage appliances designed for continuous heating. Powering them with a typical residential inverter and battery system is usually not feasible or cost-effective. These appliances draw a significant amount of power, which would require a very large and expensive inverter and a substantial battery bank, quickly draining it. Most inverter setups focus on essential low-to-medium power loads.
What maintenance does an inverter and battery system require?
Modern inverters are largely maintenance-free. For battery maintenance, lithium-ion batteries require virtually no maintenance. Lead-acid batteries, however, may require periodic checks of water levels (for flooded types) and ensuring terminals are clean and free of corrosion. It's also advisable to have the entire system inspected by a qualified electrician annually to ensure optimal performance and safety.
Will an inverter system protect my appliances from power surges and dips?
Yes, a good quality pure sine wave inverter can provide a stable and clean power supply, acting as a buffer against fluctuations from the grid, including minor surges and dips. Many inverters also have built-in surge protection. However, for comprehensive protection against severe lightning strikes or major grid faults, additional surge protection devices installed at your main distribution board are highly recommended.
Suzette Meyer is the lead author and content creator for Kandua.com, South Africa’s #1 marketplace for home services. Suzette has made it her mission to help homeowners with advice on all aspects of home repair, maintenance and improvement, including how to choose the right Pro and how to make smart upgrades that improve your resale value or save costs.

Related articles, advice and more
.webp)
How to Check If an Electrician Is Registered with ECB
The Electrical Conformance Board of South Africa (ECB) serves as a vital gatekeeper in this industry. If you are in the middle of a renovation or just need a new DB board installed, knowing how to verify your electrician’s registration is the most important step you can take.
What to Do If You Smell Burning from an Electrical Outlet
For South African homeowners, electrical faults are a leading cause of house fires. Whether it is caused by old wiring in heritage homes in suburbs like Melville or Observatory, or the strain placed on systems by post-load shedding surges, knowing exactly how to react can save your property and your life.This guide details the immediate steps you must take, the likely causes of the smell, and what to expect when you call in a professional.
.webp)
.webp)
.webp)
Your Inverter is Repaired! Key Checks to Ensure Continued Backup Power in SA
This guide will walk you through the essential checks and maintenance tips to maximise the lifespan and efficiency of your recently repaired inverter and battery setup, straight from the insights of experienced electricians across South Africa.
.webp)
.webp)
.webp)
Latest articles, advice and more
%20(1).webp)
%20(1).webp)
How to Check If an Electrician Is Registered with ECB
The Electrical Conformance Board of South Africa (ECB) serves as a vital gatekeeper in this industry. If you are in the middle of a renovation or just need a new DB board installed, knowing how to verify your electrician’s registration is the most important step you can take.
.webp)
What Does a Plumbing Call-Out Fee Usually Include?
When that familiar drip-drip-drip starts under the kitchen sink or your geyser begins a slow weep in the ceiling, the first thing most South African homeowners do is pick up the phone. But before a wrench even touches a pipe, you’ll likely hear the term "call-out fee."
.jpg)
How to Choose Between Repair and Replacement for Your Geyser
Deciding between repairing and replacing isn't just about the immediate price tag. It is about safety, long-term electricity savings, and compliance with South African building regulations. Based on insights from vetted plumbers across Johannesburg, Cape Town, and Durban, this guide will help you navigate that decision with confidence.
.webp)
Beyond the Unboxing: A Detailed Guide to Correct Washing Machine Plumbing & Setup
New washing machine in South Africa? Learn essential plumbing and setup tips to prevent leaks, ensure efficient operation, and extend your appliance’s lifespan - expert advice before your first load.
.webp)
New Washing Machine? Don't Plug It In Yet! Essential Installation Tips for SA Homes
Installing a new washing machine? Learn the essential setup steps South African homeowners often overlook to prevent leaks, noise, and damage—and ensure efficient, long-lasting performance from day one.
.webp)
TV Repair Costs in South Africa: Diagnosing Screen, Power & Component Issues
Find out what TV repairs really cost in South Africa – from call-out and diagnosis fees to screen, power and main board fixes – and when it’s cheaper to replace your TV instead of repairing it.
.webp)
Septic Tank Leak Repair Cost in South Africa: Addressing Odours & Environmental Hazards
Learn typical septic tank leak repair costs in South Africa, what drives the price up, how to spot early warning signs (odours, soggy ground, backups), and when it’s safer and cheaper to get a professional in.
.webp)
Hidden Water Leak Detection Cost in South Africa: Non-Invasive Solutions
Discover what hidden water leak detection really costs in South Africa – from acoustic and thermal imaging to tracer gas – and when it’s worth calling a non-invasive leak detection specialist to avoid massive water damage and repair bills.
How to Install a Horizontal Geyser | Step-by-Step Pro Guide
Want to install a geyser like a pro? This step-by-step tutorial shows you exactly how to do a horizontal Ariston Axios geyser installation, straight from the BluLever plumbing workshop. 🎥 Hosted by MK, BluLever’s technical facilitator, and supported by a qualified electrician, Life and a BluLever graduate artisan, Zinhle. This is your ultimate guide to a SANS 10254-compliant installation — from preparing the wall, to plumbing, electrical wiring, and pro troubleshooting tips.
How to Maintain a Geyser | Step-by-Step Pro Guide
Want to maintain a geyser like a pro? This step-by-step tutorial shows you exactly how to do the three core geyser maintenance checks on an Ariston Axios geyser installation, straight from the BluLever plumbing workshop. 🎥 Hosted by MK, BluLever’s technical facilitator, and supported by a qualified electrician, Life. This is your ultimate guide to geyser maintenance — from diagnosing the problem to checking the heat regulation of the geyser, to pressure regulation and then finally corrosion protection.
%201.avif)
Not just another newsletter. It's an advantage


From problem to solved


.svg)