
.webp)
Ready for Solar? A Basic Guide to What a Home Solar Installation Entails in South Africa
Considering solar for your South African home? This guide explains what a solar installation really involves, from planning to activation, helping you set expectations and go solar with confidence.

Ready for Solar? A Basic Guide to What a Home Solar Installation Entails in South Africa
South Africa's love affair with solar power is growing, and for good reason! With load shedding still a reality and electricity costs on the rise, many homeowners are looking to the sun for reliable and sustainable power. But what exactly happens when you decide to go solar? It's more than just putting panels on your roof. This guide will walk you through the typical stages of a home solar installation in South Africa, setting realistic expectations and demystifying the process.
From our network of experienced solar installers, we've gathered insights into what homeowners can expect. They often share stories of initial homeowner apprehension turning into excitement as the system comes to life, providing that much-desired energy independence.
The Journey Begins: Initial Consultation and Site Assessment
Every successful solar installation starts with a thorough understanding of your needs and your property. This initial phase is crucial and sets the foundation for the entire project.
1. First Chat: Understanding Your Needs
Before any equipment is ordered or hammers are swung, a reputable solar provider will have a detailed discussion with you. This isn't just a sales pitch; it's about understanding your current electricity consumption, your goals (e.g., full off-grid, backup during load shedding, reducing your bill), and your budget.
- Real-world scenario: We recently heard from an installer in Durban who recalled a client who initially wanted a massive off-grid system, but after a deep dive into their electricity bills and daily usage patterns, it became clear a smaller, hybrid system with battery backup would meet their needs perfectly and save them significant money upfront. It's all about tailoring the solution.
2. The Critical Site Assessment
This is where the technical experts come in. A qualified solar technician or engineer will visit your property to conduct a comprehensive assessment. This isn't just a quick look; it's a detailed evaluation that covers several key aspects:
- Roof Suitability: They'll check your roof's condition, age, material (tiled, corrugated iron, flat concrete), orientation (ideally north-facing in South Africa for optimal sun exposure), and pitch (the angle of your roof).
- Structural Integrity: This is paramount. A structural engineer may be required to assess if your roof can safely support the additional weight of the solar panels and mounting structures, especially in older homes or for larger systems. This adheres to standards like SANS 10400-A.
- Shading Analysis: They'll identify any potential shading issues from nearby trees, chimneys, or neighbouring buildings throughout the day and across seasons. Even small amounts of shade can significantly impact panel efficiency.
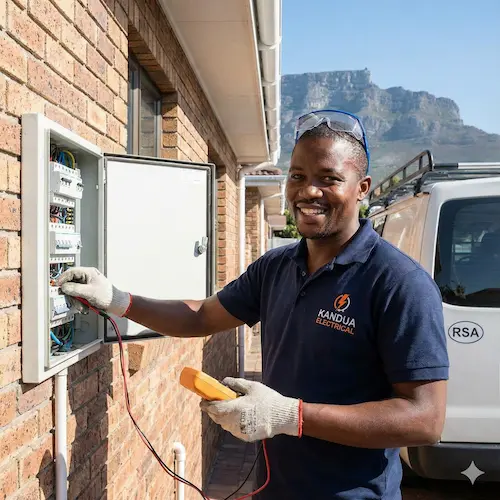
- Electrical Infrastructure: The existing electrical system of your home will be inspected, including your main distribution board (DB board) to ensure it can safely integrate with the new solar system. This includes checking for compliance with SANS 10142-1 regulations.
- Space for Components: They'll determine suitable locations for the inverter, batteries (if applicable), and other electrical components, ensuring proper ventilation and accessibility.
- Realistic Expectation: This assessment can sometimes take a few hours, and the structural review alone might take up to two weeks, as highlighted by some of our professional partners. It's a vital step, so don't rush it.
The Design and Approval Phase
Once the site assessment is complete, the information gathered is used to design a system tailored to your specific requirements.
1. System Design and Proposal
Based on the assessment, the solar provider will design a system that includes the number and type of solar panels, the inverter(s), battery storage (if chosen), and all necessary wiring and mounting hardware. They'll then present you with a detailed proposal, outlining the system specifications, estimated energy production, and of course, the costs.
2. Regulatory Approvals
In South Africa, connecting a solar system to the grid often requires approval from your local municipality or Eskom. This process ensures your system complies with NERSA regulations and doesn't negatively impact the grid. Your installer should guide you through this, which typically involves submitting documentation and designs for approval.
- Expert insight: Installers often advise starting the approval process early, as it can sometimes be the longest part of the pre-installation phase. They often joke about the "paperwork marathon" before the real work begins!
Installation Day: Bringing Your Solar System to Life
Once approvals are in place and components are on-site, the physical installation begins. This is typically a multi-day process, depending on the system's complexity.
1. Mounting the Structure
The first step on installation day (or days) involves securely attaching the mounting rails to your roof. These rails are typically made of aluminium and are designed to withstand South African weather conditions. Great care is taken to ensure the roof remains waterproof after the attachments are made.
- Safety First: Working on roofs requires strict adherence to safety protocols. Our expert installers always stress the importance of proper harnesses and fall protection, complying with Occupational Health and Safety Act guidelines.
2. Installing the Solar Panels
With the mounting structure in place, the solar panels are carefully lifted and secured onto the rails. The panels are positioned to maximise sunlight exposure, considering the optimal tilt angle for your specific location in South Africa (typically between 25 and 30 degrees for north-facing roofs).
3. Wiring the System
This is where the electrical expertise truly shines. The solar panels are connected to each other and then to the inverter. The inverter, often placed in a cool, well-ventilated area near your main DB board, converts the direct current (DC) electricity generated by the panels into alternating current (AC) electricity that your home appliances use. Batteries (if part of your system) are also wired into the system, managed by a charge controller. All wiring must comply with SANS 10142-1 standards for electrical installations.
- Experienced Electrician: This is not a DIY job unless you are a qualified and registered electrician. As our professionals attest, incorrect wiring can be dangerous and inefficient. They often recount instances where they've had to fix DIY attempts that resulted in costly damage or, worse, safety hazards. A Certificate of Compliance (COC) from a registered electrician is a must-have for legal and safe operation.
4. Connecting to the DB Board
The solar system is then connected to your home's main distribution board. This integration allows the solar-generated electricity to power your home and, in grid-tied systems, to feed excess power back to the grid (if your municipality allows it) or store it in batteries.
Commissioning and Handover
The final stage involves testing the system and ensuring you understand how to use it.
1. Testing and Commissioning
Once all components are installed and wired, the system undergoes rigorous testing. This involves checking all connections, verifying voltage and current outputs, and ensuring the inverter and batteries (if installed) are functioning correctly. The system is then officially "commissioned," meaning it's powered up and ready to generate electricity.
- Attention to detail: "The commissioning phase is where we ensure everything hums just right," an installer from Cape Town once explained. "It's like the grand unveiling, and seeing the homeowner's face light up when they see their electricity meter spinning backwards – that's the best part."
2. Final Inspections and COC
A final inspection will be conducted by a qualified electrician, who will issue a Certificate of Compliance (COC). This document is critical as it certifies that your solar installation meets all South African electrical safety standards and regulations. Without a valid COC, your system is not legally compliant.
3. Handover and Training
Your installer will then walk you through your new solar system, explaining how it works, how to monitor its performance, and any basic maintenance tips. You'll receive all relevant warranties and user manuals for your equipment.
How Long Does Solar Installation Take?
The duration of a solar installation can vary significantly based on the size and complexity of the system.
- Residential Systems: For a typical residential solar backup power or grid-tied system, the physical installation can usually be completed within one to three days.
- Larger or More Complex Systems: If you're installing a very large system, or if there are unforeseen challenges like extensive roof repairs needed, it could take longer.
- Permit and Approval Process: Remember, the physical installation time doesn't include the often longer period required for initial consultations, site assessments, system design, and obtaining municipal or Eskom approvals. This pre-installation phase can range from a few weeks to several months, depending on your local authority.
In summary, while the physical installation is relatively quick, be prepared for a lead time that accounts for thorough planning, design, and regulatory processes to ensure a safe, efficient, and compliant solar system for your home.
Frequently Asked Questions
Do I need to clean my solar panels?
Yes, regular cleaning of your solar panels is recommended to maintain optimal efficiency. Dust, dirt, and bird droppings can accumulate and reduce energy production. In South Africa's dry seasons, this can be particularly relevant. Cleaning them a few times a year with plain water and a soft brush is usually sufficient.
What kind of maintenance does a solar system require?
Beyond cleaning, solar systems require relatively low maintenance. It's advisable to have a professional check-up every year or two to ensure all components are functioning optimally, connections are secure, and there are no signs of wear and tear. This helps extend the lifespan of your system.
Can I expand my solar system in the future?
In many cases, yes! It's often possible to add more solar panels or increase battery storage capacity to an existing system. However, this depends on the initial design and the capacity of your inverter. Discussing potential future expansion with your installer during the initial planning phase is always a good idea.
What happens to my solar system during load shedding?
If you have a solar system with battery backup, your home will continue to have power during load shedding, drawing electricity from your batteries. Grid-tied systems without battery backup will typically shut down during load shedding for safety reasons, to prevent power from being fed back into the grid while it's down.
Suzette Meyer is the lead author and content creator for Kandua.com, South Africa’s #1 marketplace for home services. Suzette has made it her mission to help homeowners with advice on all aspects of home repair, maintenance and improvement, including how to choose the right Pro and how to make smart upgrades that improve your resale value or save costs.

Related articles, advice and more
.webp)
How to Check If an Electrician Is Registered with ECB
The Electrical Conformance Board of South Africa (ECB) serves as a vital gatekeeper in this industry. If you are in the middle of a renovation or just need a new DB board installed, knowing how to verify your electrician’s registration is the most important step you can take.
What to Do If You Smell Burning from an Electrical Outlet
For South African homeowners, electrical faults are a leading cause of house fires. Whether it is caused by old wiring in heritage homes in suburbs like Melville or Observatory, or the strain placed on systems by post-load shedding surges, knowing exactly how to react can save your property and your life.This guide details the immediate steps you must take, the likely causes of the smell, and what to expect when you call in a professional.
.webp)
.webp)
.webp)
Your Inverter is Repaired! Key Checks to Ensure Continued Backup Power in SA
This guide will walk you through the essential checks and maintenance tips to maximise the lifespan and efficiency of your recently repaired inverter and battery setup, straight from the insights of experienced electricians across South Africa.
.webp)
.webp)
.webp)
Latest articles, advice and more
%20(1).webp)
%20(1).webp)
How to Check If an Electrician Is Registered with ECB
The Electrical Conformance Board of South Africa (ECB) serves as a vital gatekeeper in this industry. If you are in the middle of a renovation or just need a new DB board installed, knowing how to verify your electrician’s registration is the most important step you can take.
.webp)
What Does a Plumbing Call-Out Fee Usually Include?
When that familiar drip-drip-drip starts under the kitchen sink or your geyser begins a slow weep in the ceiling, the first thing most South African homeowners do is pick up the phone. But before a wrench even touches a pipe, you’ll likely hear the term "call-out fee."
.jpg)
How to Choose Between Repair and Replacement for Your Geyser
Deciding between repairing and replacing isn't just about the immediate price tag. It is about safety, long-term electricity savings, and compliance with South African building regulations. Based on insights from vetted plumbers across Johannesburg, Cape Town, and Durban, this guide will help you navigate that decision with confidence.
.webp)
Beyond the Unboxing: A Detailed Guide to Correct Washing Machine Plumbing & Setup
New washing machine in South Africa? Learn essential plumbing and setup tips to prevent leaks, ensure efficient operation, and extend your appliance’s lifespan - expert advice before your first load.
.webp)
New Washing Machine? Don't Plug It In Yet! Essential Installation Tips for SA Homes
Installing a new washing machine? Learn the essential setup steps South African homeowners often overlook to prevent leaks, noise, and damage—and ensure efficient, long-lasting performance from day one.
.webp)
TV Repair Costs in South Africa: Diagnosing Screen, Power & Component Issues
Find out what TV repairs really cost in South Africa – from call-out and diagnosis fees to screen, power and main board fixes – and when it’s cheaper to replace your TV instead of repairing it.
.webp)
Septic Tank Leak Repair Cost in South Africa: Addressing Odours & Environmental Hazards
Learn typical septic tank leak repair costs in South Africa, what drives the price up, how to spot early warning signs (odours, soggy ground, backups), and when it’s safer and cheaper to get a professional in.
.webp)
Hidden Water Leak Detection Cost in South Africa: Non-Invasive Solutions
Discover what hidden water leak detection really costs in South Africa – from acoustic and thermal imaging to tracer gas – and when it’s worth calling a non-invasive leak detection specialist to avoid massive water damage and repair bills.
How to Install a Horizontal Geyser | Step-by-Step Pro Guide
Want to install a geyser like a pro? This step-by-step tutorial shows you exactly how to do a horizontal Ariston Axios geyser installation, straight from the BluLever plumbing workshop. 🎥 Hosted by MK, BluLever’s technical facilitator, and supported by a qualified electrician, Life and a BluLever graduate artisan, Zinhle. This is your ultimate guide to a SANS 10254-compliant installation — from preparing the wall, to plumbing, electrical wiring, and pro troubleshooting tips.
How to Maintain a Geyser | Step-by-Step Pro Guide
Want to maintain a geyser like a pro? This step-by-step tutorial shows you exactly how to do the three core geyser maintenance checks on an Ariston Axios geyser installation, straight from the BluLever plumbing workshop. 🎥 Hosted by MK, BluLever’s technical facilitator, and supported by a qualified electrician, Life. This is your ultimate guide to geyser maintenance — from diagnosing the problem to checking the heat regulation of the geyser, to pressure regulation and then finally corrosion protection.
%201.avif)
Not just another newsletter. It's an advantage


From problem to solved


.svg)