
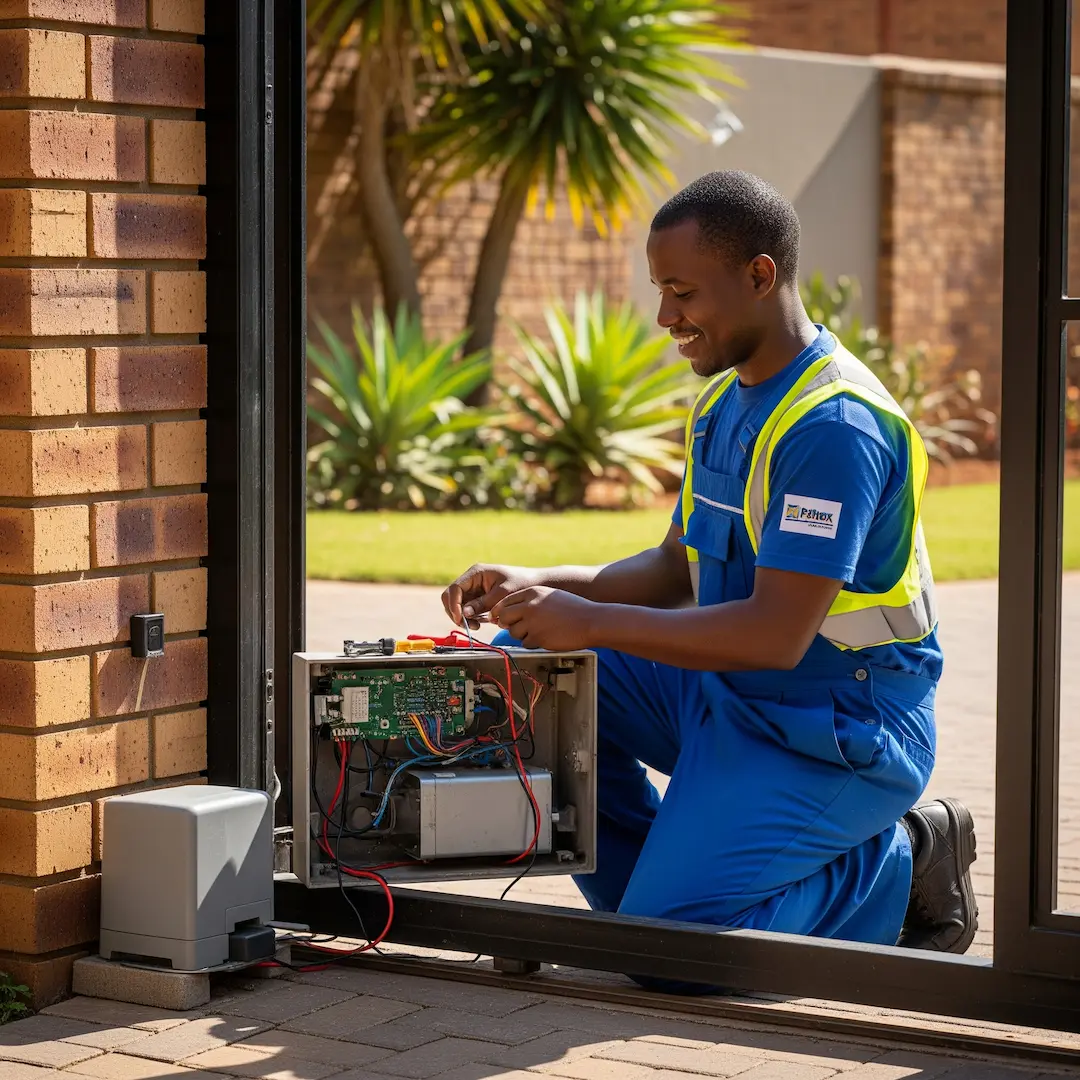
Your Gate Motor is Working Again! Post-Repair Care for Security & Longevity in SA
Gate motor repaired? Discover essential post-repair maintenance tips to protect security, extend lifespan, and prevent repeat breakdowns—tailored for South African homes and climate conditions.

Your Gate Motor is Working Again! Post-Repair Care for Security & Longevity in SA
Having your gate motor repaired brings a great sense of relief, restoring your home's security and convenience. But the repair isn't the end of the story. To ensure your gate motor continues to function smoothly for years to come and to avoid unexpected breakdowns, a little proactive post-repair care goes a long way. Think of it as an investment in your peace of mind and property value.
Our trusted service providers often share that neglecting basic maintenance after a repair is one of the quickest ways to find yourself needing another call-out. They've seen countless instances where a simple, regular check-up could have prevented a major issue, saving homeowners both time and money. This guide will walk you through essential maintenance steps, specifically tailored for the South African climate and typical gate motor setups.
Why Post-Repair Maintenance is Crucial
Even after a professional repair, various factors can affect your gate motor's performance. Dust, debris, harsh weather conditions, and general wear and tear are constant threats. Regular maintenance not only prolongs the lifespan of your motor but also ensures your gate operates safely and efficiently, providing the security you rely on. It’s about being proactive rather than reactive, spotting minor issues before they escalate into costly repairs.
Essential Post-Repair Maintenance Steps
Let's dive into the practical steps you can take to keep your gate motor in top condition.
1. Keeping the Gate Track Clean
This is perhaps one of the most overlooked, yet vital, maintenance tasks. The gate track, whether it's a sliding gate or a swing gate's pivot points, is constantly exposed to the elements.
- Expert Insight: "I've arrived at jobs where the gate motor was struggling, not because of an internal fault, but simply because the track was so choked with leaves, dirt, and even small stones that the gate couldn't move freely," one of our experienced technicians once recounted. "It's like trying to run a race with weights on your ankles – the motor has to work so much harder, leading to premature wear and tear."
- How to do it:Sweep or brush regularly: At least once a month, take a stiff-bristled broom or brush and clear away any loose debris from the track. Pay particular attention to the ends of the track where dirt tends to accumulate.
- Clear stubborn grime: For more stubborn dirt or mud, you might need a scraper or a trowel. Ensure no small rocks or pebbles are lodged in the track, as these can cause significant damage to the gate wheels or the motor's pinion gear.
- Check drainage: Ensure that any drainage points around the track are clear to prevent water from pooling, which can lead to rust and corrosion, especially on metal tracks.
2. Lubricating Moving Parts
Proper lubrication reduces friction, allowing the gate and motor components to move smoothly and effortlessly. This is key to preventing unnecessary strain on the motor.
- Expert Insight: A common issue expert repairers encounter is squeaking or grinding noises from gates. More often than not, it's a sign of neglected lubrication. "The difference a bit of lithium grease can make is incredible," a professional installer explained. "It's like giving the motor a smooth path to follow, significantly reducing its workload."
- How to do it:Focus on the gate wheels/rollers: For sliding gates, apply a silicone-based lubricant or a light grease to the bearings of the gate wheels. Do not use oil, as it can attract dust and grime.
- Check hinges for swing gates: For swing gates, lubricate the hinges with a spray lubricant designed for outdoor use.
- Lubricate the motor's chain or rack (sliding gates):Chain-driven motors: Apply a dry chain lubricant (like those used for bicycle chains) to the entire length of the chain. Avoid sticky greases that can attract dirt.
- Rack and pinion motors: While the rack and pinion are designed to be self-lubricating, a light application of lithium grease can further reduce friction. Clean the rack thoroughly before applying any lubricant.
- Frequency: Lubricate moving parts every three to six months, or more frequently if your gate is used very often or exposed to harsh dusty conditions.
3. Inspecting and Testing Safety Features
Your gate motor isn't just about convenience; it's a crucial security and safety device. After a repair, it’s paramount to ensure all safety features are functioning correctly.
- Expert Insight: "I once had a call-out where a homeowner's gate wouldn't close properly, and it turned out their safety beams were misaligned after some garden work," recalled a seasoned professional. "It's a simple fix, but if left unaddressed, it could lead to the gate closing on a vehicle or, worse, a person." Always prioritise safety.
- How to do it:Test the anti-crushing mechanism (force limit): Most modern gate motors have a safety feature that causes the gate to reverse if it encounters an obstruction. Place a non-damaging object (like a plastic bottle or a cardboard box) in the path of the gate as it closes. The gate should stop and reverse. If it doesn't, or if it exerts excessive force, contact a qualified technician immediately. This is a critical safety feature.
- Check infrared safety beams: If your gate has safety beams (small sensors on either side of the gate opening), test them by breaking the beam with your body (carefully!) as the gate closes. The gate should stop or reverse. Ensure the beams are clean and properly aligned. Dust, spiderwebs, or even a slight bump can cause misalignment.
- Verify manual override: Familiarise yourself with your gate motor's manual override mechanism. In case of a power failure or motor malfunction, you'll need to know how to disengage the motor and open the gate manually. Test this feature periodically to ensure it's working smoothly and you know where the key or lever is.
- Inspect wiring and connections: While you shouldn't tamper with electrical wiring, you can visually inspect for any loose connections, frayed wires, or signs of rodent damage around the motor unit. If you notice anything concerning, call a qualified electrician or gate motor technician.
4. Keeping the Area Around the Motor Clear
The motor unit itself needs breathing room and protection.
- How to do it:Clear vegetation: Ensure no plants, shrubs, or tree branches are growing too close to the motor or the gate's moving parts. These can interfere with operation, trap moisture, and provide hiding spots for pests.
- Protect from water: While gate motors are designed to be weather-resistant, excessive water exposure can lead to issues. Ensure the motor's cover is intact and that water isn't pooling around its base. If your motor is in a very exposed area, consider a small, ventilated cover.
- Pest control: Insects, especially ants and even small rodents, can build nests inside the motor housing, causing damage to circuit boards and wiring. Regularly check for signs of pests and take appropriate measures. Consider placing ant repellent around the base of the motor.
5. Battery Maintenance (if applicable)
Many gate motors in South Africa have backup batteries to ensure operation during power outages.
- Expert Insight: "I've lost count of how many call-outs are simply due to a dead or dying backup battery," an installer explained. "Homeowners often forget these batteries have a lifespan, typically 2-3 years, and need replacing."
- How to do it:Check battery health: If your gate motor struggles during a power outage or the motor unit emits a low-battery warning, it's likely time to replace the battery.
- Consider professional replacement: While replacing a battery might seem straightforward, it involves working with electrical components. If you're not confident, it's always best to have a qualified technician replace it.
When to Call a Professional
While regular DIY maintenance can prevent many issues, some problems require the expertise of a professional gate motor technician.
- If you notice:Unusual noises (grinding, clunking, squealing) that don't go away after lubrication.
- Gate moving erratically, stopping mid-way, or reversing without obstruction.
- Motor overheating or emitting a burning smell.
- Problems with the remote control that aren't solved by battery replacement.
- Any issues with the safety features that you cannot resolve yourself.
- Visible damage to the motor casing, wiring, or gate structure.
Remember, a professional gate motor technician has the specialised tools, knowledge, and experience to diagnose and fix complex issues safely and effectively. They can also advise on specific maintenance for your gate motor model and conduct more thorough checks that go beyond basic user maintenance.
By dedicating a little time to post-repair care and regular maintenance, you're not just ensuring your gate motor works; you're safeguarding your property, maintaining convenience, and avoiding potentially costly future repairs.
Frequently Asked Questions
How often should I perform maintenance on my gate motor?
Basic maintenance like cleaning tracks and visual inspections should ideally be done monthly. More in-depth tasks like lubricating moving parts can be done every three to six months, depending on the gate's usage and environmental conditions.
What kind of lubricant should I use for my gate motor?
For gate wheels and hinges, a silicone-based spray lubricant or a light lithium grease is generally recommended. For chain-driven motors, use a dry chain lubricant. Avoid using WD-40 or similar penetrating oils as they can attract dirt and grime in the long run.
My gate remote isn't working, what should I check first?
First, try replacing the batteries in your remote control. If that doesn't solve the problem, check if the gate motor unit is receiving power. If power is present, the remote might need to be reprogrammed, or there could be an issue with the receiver in the motor unit, which would require professional assistance.
Can extreme weather in South Africa affect my gate motor?
Yes, absolutely. High temperatures can stress electronic components, while heavy rain can lead to rust and corrosion if the motor isn't adequately protected. Dust and strong winds can also deposit debris in tracks and moving parts. Regular cleaning and ensuring proper drainage and protection for the motor unit are crucial in South African weather conditions.
Suzette Meyer is the lead author and content creator for Kandua.com, South Africa’s #1 marketplace for home services. Suzette has made it her mission to help homeowners with advice on all aspects of home repair, maintenance and improvement, including how to choose the right Pro and how to make smart upgrades that improve your resale value or save costs.

Related articles, advice and more
.webp)
How to Check If an Electrician Is Registered with ECB
The Electrical Conformance Board of South Africa (ECB) serves as a vital gatekeeper in this industry. If you are in the middle of a renovation or just need a new DB board installed, knowing how to verify your electrician’s registration is the most important step you can take.

What to Do If You Smell Burning from an Electrical Outlet
For South African homeowners, electrical faults are a leading cause of house fires. Whether it is caused by old wiring in heritage homes in suburbs like Melville or Observatory, or the strain placed on systems by post-load shedding surges, knowing exactly how to react can save your property and your life.This guide details the immediate steps you must take, the likely causes of the smell, and what to expect when you call in a professional.
.webp)
.webp)
.webp)
Your Inverter is Repaired! Key Checks to Ensure Continued Backup Power in SA
This guide will walk you through the essential checks and maintenance tips to maximise the lifespan and efficiency of your recently repaired inverter and battery setup, straight from the insights of experienced electricians across South Africa.
.webp)
.webp)
.webp)
Latest articles, advice and more
%20(1).webp)
%20(1).webp)
How to Check If an Electrician Is Registered with ECB
The Electrical Conformance Board of South Africa (ECB) serves as a vital gatekeeper in this industry. If you are in the middle of a renovation or just need a new DB board installed, knowing how to verify your electrician’s registration is the most important step you can take.
.webp)
What Does a Plumbing Call-Out Fee Usually Include?
When that familiar drip-drip-drip starts under the kitchen sink or your geyser begins a slow weep in the ceiling, the first thing most South African homeowners do is pick up the phone. But before a wrench even touches a pipe, you’ll likely hear the term "call-out fee."
.jpg)
How to Choose Between Repair and Replacement for Your Geyser
Deciding between repairing and replacing isn't just about the immediate price tag. It is about safety, long-term electricity savings, and compliance with South African building regulations. Based on insights from vetted plumbers across Johannesburg, Cape Town, and Durban, this guide will help you navigate that decision with confidence.
.webp)
Beyond the Unboxing: A Detailed Guide to Correct Washing Machine Plumbing & Setup
New washing machine in South Africa? Learn essential plumbing and setup tips to prevent leaks, ensure efficient operation, and extend your appliance’s lifespan - expert advice before your first load.
.webp)
New Washing Machine? Don't Plug It In Yet! Essential Installation Tips for SA Homes
Installing a new washing machine? Learn the essential setup steps South African homeowners often overlook to prevent leaks, noise, and damage—and ensure efficient, long-lasting performance from day one.
.webp)
TV Repair Costs in South Africa: Diagnosing Screen, Power & Component Issues
Find out what TV repairs really cost in South Africa – from call-out and diagnosis fees to screen, power and main board fixes – and when it’s cheaper to replace your TV instead of repairing it.
.webp)
Septic Tank Leak Repair Cost in South Africa: Addressing Odours & Environmental Hazards
Learn typical septic tank leak repair costs in South Africa, what drives the price up, how to spot early warning signs (odours, soggy ground, backups), and when it’s safer and cheaper to get a professional in.
.webp)
Hidden Water Leak Detection Cost in South Africa: Non-Invasive Solutions
Discover what hidden water leak detection really costs in South Africa – from acoustic and thermal imaging to tracer gas – and when it’s worth calling a non-invasive leak detection specialist to avoid massive water damage and repair bills.
How to Install a Horizontal Geyser | Step-by-Step Pro Guide
Want to install a geyser like a pro? This step-by-step tutorial shows you exactly how to do a horizontal Ariston Axios geyser installation, straight from the BluLever plumbing workshop. 🎥 Hosted by MK, BluLever’s technical facilitator, and supported by a qualified electrician, Life and a BluLever graduate artisan, Zinhle. This is your ultimate guide to a SANS 10254-compliant installation — from preparing the wall, to plumbing, electrical wiring, and pro troubleshooting tips.
How to Maintain a Geyser | Step-by-Step Pro Guide
Want to maintain a geyser like a pro? This step-by-step tutorial shows you exactly how to do the three core geyser maintenance checks on an Ariston Axios geyser installation, straight from the BluLever plumbing workshop. 🎥 Hosted by MK, BluLever’s technical facilitator, and supported by a qualified electrician, Life. This is your ultimate guide to geyser maintenance — from diagnosing the problem to checking the heat regulation of the geyser, to pressure regulation and then finally corrosion protection.
%201.avif)
Not just another newsletter. It's an advantage


From problem to solved


.svg)